How to write a Visual Studio Code color theme from scratch
I hope you agree with me when I say that Visual Studio Code (from here on just VSC) is today’s best text editor. The feature set is growing over a nice monthly based release cycle, the customization options cover almost everything you’d need and the integration with Git is top-notch. It even has an integrated terminal! 😇
[UPDATE, August 2017] With version 1.15, VSC has improved a lot in this area, even adding specific settings (and UI: a nifty color picket) to enable the user to customise the syntax highlight feature without having to create a full blown custom theme. Read more about this new feature.
One area that I feel like is lacking behind, though, is the way you can customize your color themes, mostly syntax highlight and chrome widgets. The way you need to operate to achieve what you want is a bit cumbersome and it feels to me that it’s a part of the project still not mature, son of the “release early, release often” frenziedness of the first days.
VSC uses a JSON file based configuration system, where you open the settings, fiddle with some of the variables in there, save the file, done. No fancy UI is given and this is perfectly fine, unless — well– you need to work on a different scale of a problem which doesn’t involve just fixing two or three values.
I remember thinking, one day when I wanted to change the color of the syntax highlight for my strings:“I am perfectly fine with everything; I’d just like my text strings and numbers to stand out a little bit more. A yellow, maybe?”. And I was immediately stuck by the absurd difficulties involved in this rather simple task.
I then decided to take a step back and investigate the whole “create a VSC color theme” topic before skinning it to the bare bones.
The official guide for creating themes, recommends you to install Yeoman and use its “code” generator to scaffold the theme. The problem with this approach is that Yeoman will ask you for a template to start with but unless you exactly know what you’re doing you’ll end up wasting a lot of time actually removing what you don’t need or like, rather than just creating something from you, for you.
This guide won’t use Yeoman but instead it will show you all the what-is-what of the theme creation business.
Prerequisites
I’ll consider the reader familiar with npm (or at least having it installed) and with editing a JSON file following the JSON syntax.
The building blocks of a theme
To create your own theme, first of all you need a directory where to put it. This place, in macOS, OSX or Linux is in the ~/.vscode/extensions directory while in Windows it should be in %USERPROFILE%\.vscode\extensions. Create a directory in there, using the name of your soon-to-be-created theme, and cd into it.
A theme is ultimately composed by:
- a package.json file which describes it
- a theme file, in JSON format
- a README, not necessary but always a nice touch
The package.json file
We can start with a very basic npm init to create the bare bones file. Since a theme can be packaged and published (for example in the VSC marketplace), we consider it as an npm module. Technically, though, what we are writing is a VSC extension.
Important: remove the
mainattribute, if present, from the package.json file. If it’s present and it points to a non-existant file, your theme won’t load.
Beside the standard attributes of a package.json file, there are some of them that need to be defined as part of the theme itself, needed by VSC and the marketplace.
What follows is an excerpt of the package.json with what I consider the very minimum set of attributes to get your theme working:
{

 ...

    "publisher": "claudioc",
    "engines": {
        "vscode": "^1.0.0"
    },
    "categories": [
        "Themes"
    ],
    "contributes": {
        "themes": [
            {
                "label": "MyTheme",
                "uiTheme": "vs-dark",
                "path": "./themes/my-theme.json"
            }
        ]
    }

...

}- The publisher is your username on the VSC marketplace (not necessary, unless you want to publish it)
- The categories is also part of the Marketplace information
- The contributes section is quite explanatory by itself and contains all that’s needed for VSC to be able to select your theme from the Theme Selector
The theme file
Now for the real deal: create a new file, supposedly named after the name of your theme, and place it inside the themes subdirectory of the theme itself. The extension and (syntax) of the file must be json.
Within a theme, you’ll be able to change the aspect of almost all the elements of VSC’s user interface, not just the syntax highlight of your files.
When you want to change the aspect of something in a theme file, you need two things:
- A way to select the “thing” you want to change and,
- A syntax to define how to change it (i.e. apply a new color, or a font style)
Now, the first bit of confusion is that VSC uses a “selector” syntax of its own to select items on its chrome interface, whereas for the (much more complex) business of selecting the tokens for the syntax highlight subsystem it uses a de-facto standard which is the Textmate syntax, also adopted by Sublime Text for its own theming needs.
Both selectors and syntaxes can be used in the same file (the theme file), at the same time. You’ll need to provide “colors” for the UI and “tokens” definitions for the syntax highlight.
The root elements of the theme files would be something like this:
{
  "name": "MyThemeName",
  "type": "dark",
  "colors": {},
  "tokenColors": []
}
The important parts are the colors and tokenColors sections here. Within the colors section, you’ll change the aspect of the UI, while in tokenColors we’ll define the syntax highlight aspects.
The colors object contains keys and values like these:
"colors": {
    "editor.background": "#1B1B1B",
    "editor.foreground": "#00BCD4",
    "editor.lineHighlightBackground": "#313131"
}
For the complete list for these values (which I guess is going to change over time), I suggest you to take a look at a specific file (editorColorRegistry.ts) in the VSC repository which contains all the definitions instead of relying on a more-or-less up-to-date official documentation.
Please note that you can also change these colors without having to write a whole theme! Since a quite recent version of VSC those colors can also be set via the
workbench.colorCustomizationsobject, as explained in the official docs. These settings will always override the theme customizations.
The tokenColors is a much more harder nut to crack: it’s an array of object, and the basic structure of each object is something like this:
{
  "name": "Comments",
  "scope": ["comment", "punctuation.definition.comment"],
  "settings": {
    "foreground": "#81C784",
    "fontStyle": "italic"
  }
}
Pretty straightforward: the token that I call “Comments” (you can call it what you want) is defined by one or more “scopes”. Whenever a “comment” is encountered by the syntax highlighter parser, the settings are applied to that.
What are those scopes, then? There are actually quite a lot of them, and they basically define which elements you can “select”. If you really want to fine tune your theme you probably need to read through that document but also you have to try and see if you can actually use some of them in VSC. The bad news, indeed, is that apparently not all of those scopes are supported (?) by VSC, so that not really everything can be styled as wanted. I didn’t find, for example, a way to style the parenthesis ().
Before going forward, let’s see if we can make this new theme work. In your theme file, just use the colors sections, put a couple of colors there for editor.background and editor.foregroundand leave the tokenColors as an empty array for the moment.
If you already have VSC open (and what else would you use to edit the theme file, right? 😜) use Cmd+Shift+P and run Reload Window (you don’t need a full relaunch of VSC). Now again Cmd+Shift+P and run Preferences: Color Theme. If your theme and package.json files are syntactically correct (VSC won’t complain, unfortunately), you should be able to see (and select) your new theme from the list.
Note that the two commands we just ran, are now at the very top of the list when you use the
Cmd+Shift+Pagain. Very handy, as we’ll see
Now open one file of the language you use the most, say TypeScript.
What we want to do at this point is to be able to identify the scopes we are interested into styling so we can continue enriching our theme file with them. Luckily VSC has a very powerful tool to help us with this task.
Use Cmd+Shift+P again and this time run Developer: Inspect TM Scopes. As long as this “mode” is enabled, that is, until you press Esc, you can move through the file with the mouse or the keyboard and inspect it while looking for interesting scopes.
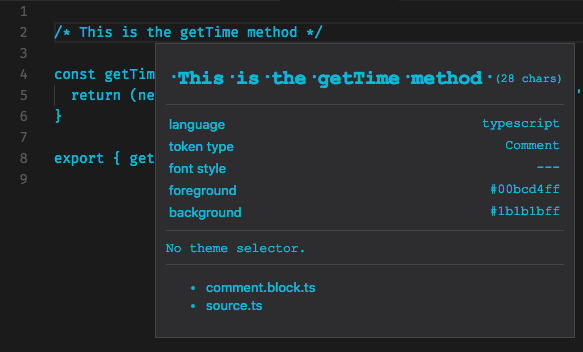
This is me trying to find the scopes for the comments:

That small popup window is giving us all the information we need: wether the theme is targeting that token (or not, “No theme selector”) and which are the scopes for that token (comment.block and source).
I am now going to style those scopes and also the const TypeScript token just for fun, by changing my theme file’s tokenColors section as follows:
...

"tokenColors": [
{
    "name": "Comments",
    "scope": [
        "comment.block"
    ],
    "settings": {
        "foreground": "#81C784",
        "fontStyle": "italic"
    }
},
{
    "name": "The const variable type",
    "scope": [
        "storage.type"
    ],
    "settings": {
        "foreground": "#EF6C00"
    }
}
]
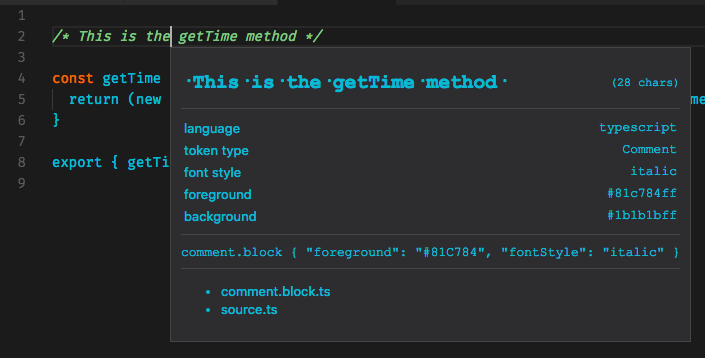
And this is the result:

As you can see the selector for the block comments is exactly what we wrote in the theme file.
Conclusion
This is basically it. You can now — with a lot of patience, to be honest– start writing your own, full theme. I find it an activity which is both very satisfying and also a bit unnerving: if for example you set the color of the storage.type to change the color of the const keyword, also the arrow of an arrow function becomes that color…).
I also think there is to consider a sort of specificity, when working with those scopes. If you have comment.block I believe you can then also select only the comment.
By the way, the color theme I wrote for myself is Goodvibe.
I am on BlueSky (@caludio.social).
Written on August 5, 2017 by Claudio Cicali.
Originally published on Medium